

I've wanted to switch to pfSense for so long. Now I finally did it.
For the last year, I've used a Sagemcom F-3686ACv2 all-in-one modem that my ISP enforces. This piece of plastic has been a major pain in the ass. Sometimes it drops the whole WI-FI and other times it loses the WAN IPv4 address. Setting static DHCP addresses has been inconsistent and tough.
Now I've migrated to pfSense and the modem is only used in bridge mode. I'm running pfSense inside an ESXi VM with 4 gigabytes of ram and 1 vCPU. I'm quite certain my CPU supports AES-NI but I haven't checked that yet. CPU utilization has been very low and we'll have to test it out with OpenVPN later.
Equipment
I've got the following hardware to work with:
- HPE OfficeConnect Procurve 1920-24g managed switch
- Proliant DL380p with 1GB 4-port NIC
- HPE Aruba IAP-305 Wireless Access Point
The switch is a managed one so we will be doing VLAN tagging with it.
The Plan
I want to organize everything properly so that the network is maintainable, clear and scalable. I only have about a dozen of computers to connect so it's more for learning and future-proofing than anything.
VLAN
So as I'm running pfSense inside the VM, I need to separate WAN and LAN either with VLANs or with different ports altogether. As I have 4 ports in my NIC, I decided to just plug the modem WAN to one port and connect another port to the switch.
Alternatively, I could've added the WAN to a new VLAN in the switch and then connect everything through the same trunk. I felt like the physical approach was a bit more robust though.
I decided to use prime numbers for my VLAN numbering, just for the hell of it. So my current VLANs look like this:
VLAN 3: Management Network
VLAN 5: Home LAN
VLAN 7: Virtual Machines
VLAN 11: Wireless LAN
Don't ask why I didn't use number 2; I don't know either. The Management Network houses everything configurable, so the ESXi management interface, switch, IAP and iLO.
Home LAN contains everything connected to the switch by ethernet. Right now only my PC belongs to this VLAN but if other computers are to be connected, they go here.
Virtual Machines get their own network. Outbound traffic from this VLAN should be addressed with proper firewall rules.
Currently I only have one VLAN for WLAN that I'm using with my IAP. In the future I'm going to make another WLAN (probably VLAN 13) for IoT devices. Right now they reside in the same WLAN as mobile phones etc.
Subnets
I'm going to use the 192.168.0.0/24 IPv4 range. Subnets are numbered the same as the VLANs, with the exception of VLAN 5 (Home LAN) which is 192.168.1.0/24.
The reason for this is that VLAN 1 should not be used as many switches use it by default!
Physical Connections

Here is a crude diagram of the physical connections. Most notable things are that the connection to the IAP is a tagged trunk and the VLAN is defined on the IAP. That way if I want to make another WLAN with a new VLAN I can just add it to the trunk.
WAN is connected directly to the hypervisor and never touches the switch.
Setting everything up
Now that we about know what we want to accomplish, let's get our hands dirty.
First I downloaded pfSense and uploaded it to the datastore. While this was happening, I started configuring the switch.
VLANs & Switches
First thing I did was setup a specific port to untagged VLAN 3 and then connect my laptop to it. Then I configured the switch interface to work on VLAN 3. After successfully talking with the switch through VLAN 3, I removed the switch interface from VLAN 1.
Next I set up the port that was connected to the hypervisor to a 2-32 trunk. I also needed to configure the Management Network port group to use VLAN id 3.
After this, the hypervisor and switch were accessible through the laptop. Do note that I had static IP addresses for both of them! This is important as no DHCP server is present on this VLAN yet. I also changed the IP subnets to 192.168.3.0/24 and changed my laptops address too.
Next up I created two new vSwitches in ESXi. One named WAN and another one named LAN. Be sure to check that the uplink matches the WAN and LAN ports on your machine!
Next up create port groups for these vSwitches. For the WAN switch, add a port group with VLAN ID 0, so that VLAN tagging is disabled.
Create another port group for LAN with a VLAN ID of 4095 as that enables Virtual Guest Tagging, meaning that the VLAN tags will be handled by the VM and not the vSwitch.
Lastly I created another port group for my virtual machines with a VLAN ID of 7. This is of course optional.
Installing pfSense
Next was installing pfSense. This was as easy as installing any other VM. Remember to assign two network adapters to the machine, WAN and LAN.
During installation, pfSense detected both network cards correctly. The installer asks if you want to setup VLANs and I recommend doing that. Optionally you can do that later too. When the VLANs were configured everything worked alright.
After that I navigated to the pfSense web interface and checked my interface assignments. They currently look like this:
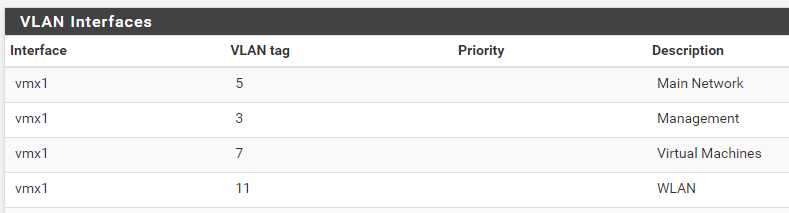

For WAN, I set both IP configuration types to DHCP. With all the local networks, I configured the IP to match the subnet. So LAN was 192.168.1.1 and VM was 192.168.7.1. Then I set the interfaces to enabled.
DHCP Server and Static Mapping
After all interfaces were enabled, I headed over to Services > DHCP Server. I enabled the DHCP server on each interface and configured the range to go from 192.168.x.100 to 192.168.x.199.
I then proceeded to change all my VM's from the default vSwitch to the new LAN switch under the VM port group. When each machine came up, I made a new DHCP static mapping. I plan to automate this in the future.
Firewall rules & NAT
The default pfSense firewall rules make it so that LAN can is allowed everywhere and all other interfaces are not allowed anywhere.
For the time being, I've allowed WLAN and LAN interfaces to pass traffic anywhere. I use my laptop and phone often enough and some IoT devices need to talk to the VM interface. In the future I'm going to separate IoT into another VLAN and then I will fine tune the firewall.
The VM interface has been made much more strict. All traffic to management is denied and outbound traffic to the rest of the LAN is denied. Computers in LAN can interact with the VM network but Virtual Machines cannot talk to the devices in LAN.
For NAT rules, I port forward ports 80 and 443 to my main VM called Showrunner. It's an old CentOS box that runs Nginx and acts as a reverse proxy for the rest of my services. pfSense creates automatically firewall rules for the created port forwards.
NAT Reflection
After successfully transferring all machines to the new network and testing that the firewall rules work, I was wondering why I could only access my websites from outside the local network.
To my surprise, pfSense did not have NAT Reflection turned on by default. Going to System > Advanced > Firewall & NAT and setting NAT Reflection mode for port forwards to Pure NAT fixed the problem. Woohoo!
Wi-Fi
Now that pfSense was working great, I wanted to get Wi-Fi working. I started by connecting the IAP to a port that was untagged and on VLAN 3.
After the IAP booted and I was able to access the web interface I set the Uplink management VLAN to 3. Then I rebooted the IAP and changed the switch port to be a trunk with IDs 3 & 11.
Adding the new networks was super straight-forward and after that everything was working. Almost.
Chromecast was not working and no devices could be found even when they were on the same subnet. I first suspected pfSense but it was actually the IAP.
The problem came from not having configured AirGroup settings. Going into Configuration > Services and enabling Bonjour, DLNA, googlecast and DLNA Media everything works.
Conclusion
Installing pfSense was a great learning experience into VLANs and routing. More importantly, I finally have full control over my local network. Goodbye shitty ISP router.
I've also been working on getting my whole local network HTTPS traffic signed with Let's Encrypt certs now and will be writing a post about that so stay tuned!